Posts Tagged ‘SSIS’

This post is about few tips that we have to tackle when dealing with postgreSQL databases. First of all what we need is to install correct postgreSQL driver, which is 32bit version in our case, in order to align with SSIS .  You can find drivers from postgresql.org .

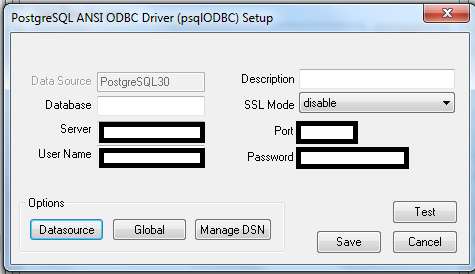
Next thing is adding new data source to odbc data source administrator. In order to do that, odbc data source administrator  should be opened from following path (for 32 bit drivers). C:\Windows\SysWOW64\odbcad32.exe . Then add the data source using driver which was just installed. Server name, port, user name and password must be provided in this step.

DS

Well, then it’s time to move towards SSIS. We can test data source by creating new connection manager in SSIS package. Create a new ODBC connection manager and select the created data source name in previous step. That’s pretty much it!

Connection_managers

Don’t forget to specify the database in connection string.  Otherwise you will get following error.

Test connection failed because of an error in initializing provider. ERROR [08001] connection string lacks some options.
Error_Connection1


Download flat files from ftp directory can be useful in many situations. Assume a situation where we need to load data from flat files into database table. In order to do that, first we need to download them to our local server. I came across this sort of scenario recently and thought to share it. This script, which I have written in VB, can be used inside a script task in SSIS control flow.       


Public Sub Main()

        Dim con_manager As ConnectionManager
        Dim ftp_client As FtpClientConnection
        Dim FolderNames() As String
        Dim FileNames() As String
        Dim FileName() As String
        Dim ie As Int32

Try

            Dim FTPConnectionManager As ConnectionManager

            FTPConnectionManager = Dts.Connections(<em>[FTP Connection Manager Name]</em>)
            FTPConnectionManager.Properties("ServerPassword").SetValue(FTPConnectionManager, Dts.Variables([FTP Password])
            FTPConnectionManager.Properties("ServerUserName").SetValue(FTPConnectionManager, Dts.Variables([FTP UserName])

             con_manager = Dts.Connections([FTP Connection Manager Name])
            ftp_client = New FtpClientConnection(con_manager.AcquireConnection(Nothing))

            ftp_client.Connect()
            ftp_client.SetWorkingDirectory([FTP Path])
            ftp_client.GetListing(FolderNames, FileNames)

            ReDim Preserve FileName(FileNames.Length - 1)

            ie = 0
	    For Each file_Name As String In FileNames
                FileName(ie) = file_Name
                ie = ie + 1
            Next file_Name

            ftp_client.ReceiveFiles(FileName, [Destination Path], True, False)
            ftp_client.DeleteFiles(FileName)
            ftp_client.Close()

            Catch ex As Exception

End Try

Dts.TaskResult = ScriptResults.Success

End Sub

Recently I had an opportunity to work in SQL Server 2005 environment. There were few limitations when developing SSIS packages. One of them is, SSIS 2005 version does not support excel 2007 source component or destination component. Since we were using SSIS 2005 version, excel source component only support up to excel 2003 format. In that case we had to configure OLE DB source component to do our task.

Here is the configuration.

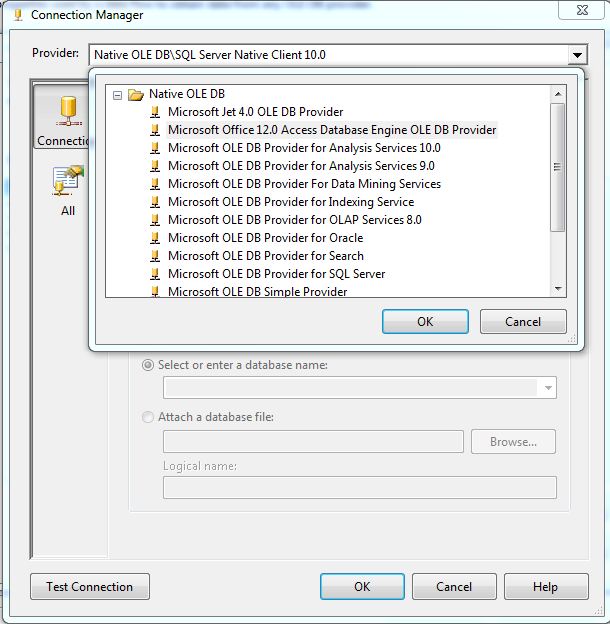
Drag and drop OLE DB source component ( or destination component) and create new connection manager. You have to choose Microsoft Office 12.0 Access Database Engine OLE DB as provider. If your server doesn’t have office 2007, then install the Microsoft Office 12.0 Access Database Engine.

http://www.microsoft.com/en-us/download/details.aspx?id=13255

NewConnection

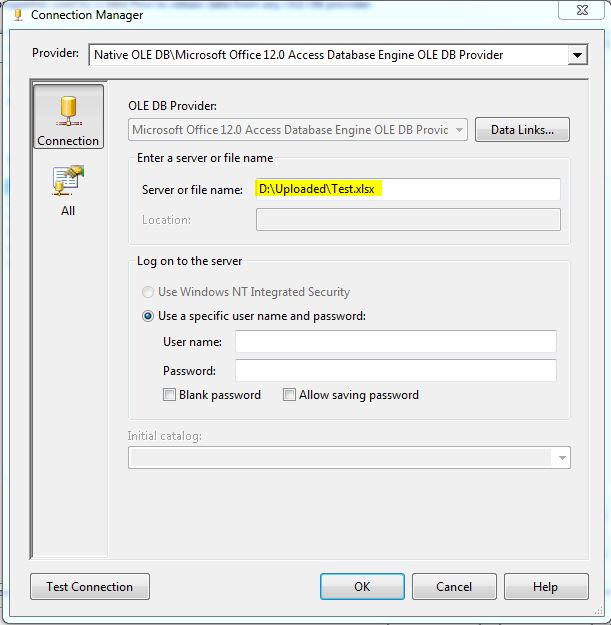
In server name box, give the excel file path. This can be changed during run time using expressions.

Server Name

Finally, We have to change one property to make this work. Go to All tab and Set extended properties to Excel 12.0

Connection Properties

Now test the connection.

This is now working as excel component. All the sheets will be listed down in table or view mode.

When we are dealing with files, it’s common to use file system task in SSIS. In these cases, we have to move files to different locations and rename them.  Even though moving and renaming files are two different tasks, you can do this using single file system task.

Simply it’s a renaming task. You can specify source file path as usual. In destination file path, you can specify the directory path with renamed file name. I have used two variables for file paths.

SourceFilePath – D:\Uploaded\Src1.txt

DestinationFilePath  – D:\Archived\SrcArchived.txt  (Destination Directory + Renamed File Name)

FileSystemTask

As you can see it’s configured to rename file task. But eventually it will move the file to destination and rename the file as we want. 🙂


One of my clients wanted to set the row delimiter dynamically for their source flat files. I said YES you can. There is a flat file connection manager and you can set the row delimiter as an expression.

Oops !

But when I tried, it didn’t work . Something went wrong ? I double checked everything. But I couldn’t find any mistake there. Then I realized it only works in design time parameters. You cannot set it dynamically in run time. Now what ?

Bulk Insert Task 🙂  literally saved my life !

YES still you can.  Use bulk insert task and import flat file data to temporary table and then do what ever you want with that table. Simple as that.

Following figure shows how to set row delimiter as an expression in bulk insert task.

BulkInsert

Then do some modifications to data flow task. ( Use this temporary table instead of flat file source ) .

Note : Bulk insert task is capable of setting not only row delimiter but also column delimiter.

I have discussed several topics about SSIS package execution and how to get execution status of SSIS package. Today I’m going to demonstrate how to deploy SSIS packages to destination (either MSDB or File System) easily.

Most of the time what we prefer to do is just copy and paste the packages one by one. But when there are many packages to deploy or when there are frequent changes in packages  ( in real world project it is normal to change packages after the deployment ),  it’s not easy to copy and pase one by one.

Therefore use the following method. This is really easy compared to copy paste manually.

In Integration Services project properties

Project Properties

  • Change the Create Deployment Utility to True
  • Then set the deployment output path where you prefer to get the deployment wizard. (default is inside project folder bin\Deployment)
  • Now you have to build the project.

Go to the output path and check all your packages and SSISDeploymentManifest file(deployment wizard). Using deployment wizard you can deploy packages to either MSDB store or file system. After changing the packages only you have to do is build the project again and run the deployment wizard.

Leave your comments …

Using Unpivot component in SSIS is a very easy task.  Following is the source table which I use as a excel source. It shows Application Software categorization and I want to get those categories (Business,Communication and Graphics) in to rows.

Business Communication Graphics
School Administration Software Microsoft Email Software 3D Graphics Software
Time Tracking Software BitTorrent Clients Image Viewers
Cost Analysis Software WordPress


Following figure shows the Data Flow task of the ssis package.

Following is how we have to configure the Unpivot component. In here Destination Column name should be same for every input column.  Other destination column name is the pivot key value column name.  You can see these column headers in out put.


This is how we get the out put after the unpivot operation.


Category Application Software
Business School Administration Software
Communication Microsoft Email Software
Graphics 3D Graphics Software
Business Time Tracking Software
Communication BitTorrent Clients
Graphics Image Viewers
Business Cost Analysis Software
Communication WordPress


Give comments about this post.

Working with Excel is bit of a mess in Integration Services.When we are extracting data from Excel files, sometimes we have to struggle with Null values.

Assume that you want to get data from selected area of an Excel file excluding Null values. Ex:-  I need to get the data only from A8:C20 range in following excel file. I don’t want to get the first 7 rows of the excel file because it’s just a topic.

This can be done directly through the Excel Source component. There is a property named OpenRowSet in Excel Source component. After configuring the Excel Source component you can only see the sheet name.

I just change the OpenRowset property to Sheet1$A8:C20 . Now it’s only extracting  data from selected area.

If you want this value can be given as a variable. It can be done easily by changing the AccessMode property .

When this error occurred to me, first what I did  is check the Begin Transaction. But unfortunately there were no problems in those components. But every time package execution get failed.

In this case we want to do some transaction and commit or rollback that transaction using same connection. So it’s essential to keep the same connection to do that operation.

We can set this using RetainSameConnection property of the connection manager. Set that property to True in the properties window.

This will solve the above problem. 🙂